
-
Current Donation Goals
-
Forum DonationsRaised $7,091 of $7,500 target
-
-
To send a donation, CLICK HERE to go to the DONATE page for options.
-
Recent Posts
-
By Randy · Posted
Nice ones Sean, have not seen the A7E ones before. Randy -

By Siamundo · Posted
All three of these came together as a group. Any idea what the tiger head patch on the right is? Is it just some weird variation of the 13th TFS or something not related but just included? Not sure where it might havebeen made. -
By Cobra 6 Actual · Posted
This celluloid armband was made by Whitehead and Hoag for use in WWI. Members of the public would by special stamps from the Post Office to help fund the War. The War Savings Service, a US Treasury Department program, was activated again in WWII. -
By mikie · Posted
Looking closer, I found a name! It’s written in barely visible pencil on a card in the small pocket below the maker’s label. I can’t really make it out for sure but it looks like R. L. Driscol (?) CSK At least I know he was Chief Storekeeper. I think I have a Storekeeper rating patch somewhere. I’ve tried playing with a photo editor but can’t really make the name clearer. I’ll need to figure out how to make it more visible. For completeness, here is a photo of the back of the name card. At least I now have a date too. mikie -
By Siamundo · Posted
Have seen many copies of this patch design over the years, but I picked this one up a couple of years ago and thought it might potentially be a good one. Guessing it might possibly be Japanese made but not positive by any means. The only reference book I have that this shows up in in Pugh's Special Forces and it's just a grainy B&W photo and notes it is machine made. Any insight would bemuch appreciated. -

By earlymb · Posted
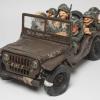
After a two-week break, work on the jeep has recommenced. We actually spent the whole day working on the wooden top of the battery case. The first job done was marking and drilling the holes for the Optima battery's terminals into the thin wooden sheet that will be the cover. The next step was to cut a few pieces of the same sheet to mimic the tops of the three 2V cells that make up a 6V battery. We actually had to shave off a layer of them to ensure enough of the terminals stick out to have enough room for the clamps. These will go on entirely, but with no room to spare. It is what is, though. We also drilled a hole in each of the tops for the filler caps that were a standard feature on all car batteries until quite recently. To make this work I used a hole saw to actually cut out the rings with the thread for the caps from the top of the old battery and with some careful trimming they go right into the holes cut in the faux top. I also had to cut off about 1/3 of the bottom of the thread on the caps themselves or they would not fit. These caps are only for looks, they have no actual function. The last thing we did was to cover all the wood in a very thin layer of wood filler to get rid of the grain. Next week I'll sand it down, apply another layer if needed, glue in threaded rings for the caps and the plastic frame around the top, and start painting everything matt black. No doubt it will take a few layers to get rid of every trace of wood grain. However, before we can do that we will need to make the final parts: the two lead bridges that connect the three 2V cells together into a 6V battery. If possible I want to make these of real lead (I kept some of the bigger chunks from the old battery). I have never poured molten lead before so it might take some experimenting, and I will need to make a mold. As with this whole project, I will use some photos as reference and see whatever size looks good proportion-wise. If the lead doesn't work out I'll make them from wood. A few weeks ago Ken posted about a spring bracket he installed for the carburettor. I had completely forgotten about this part before and realized we actually never had it on the jeep, so I made one myself guessing the measurements from a photo, as the only size I knew for sure was that of the larger hole. It will do till I find a real part. To be continued... -
By DUCKnCOVER · Posted
My mind is truly blown...what an incredible grouping! Can't wait to see what else surfaces. Congrats! -

By eagle mtn · Posted
Interesting. Ive never seen this before, but I agree with you that those are cud down chevrons -
By Firaq · Posted
Appreciate the breakdown, towel! I actually dug a bit deeper into some sources after posting this and realized a buttpack is actually farb/incorrect for the specific impression I'm building anyway. Definitely glad I checked before dropping cash on either option, but thanks for looking out, and I'll keep those in mind if I ever change direction where I will need a buttpack :) -
By Siamundo · Posted
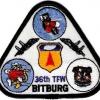
Those are great looking 407th oldies but goodies yokota57 and 42ndbombers. I hope you don't mind, but I thought I might add these as well for reference. Don't know if every section or department within the squadron had these made up but these are the only ones I have run across.
-
-

-

-
-

-
-
.jpg.2ce6a8d90c750304bcf9d4faa9318f5d.jpg.5a23d93005bf9ba70918d137e8d2e4fc.jpg)
-

-
-

-

-

-

-
* While this forum is partially supported by our advertisers, we make no claim nor endorsement of authenticity of the products which these advertisers sell. If you have an issue with any advertiser, please take it up with them and not with the owner or staff of this forum.