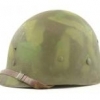
Grant G. Posted April 19, 2010 #1 Posted April 19, 2010 I bought this helmet on ebay it had the biggest dent I've ever seen in a helmet however it was no problem for a hammer. I won it for 12 dollars and figured I'd restore it here you go.
gaz232sqn Posted April 20, 2010 #3 Posted April 20, 2010 Nice one,you done a good job.......I have seen a lot worse, from so called "Expert restorers" Good on ya Mate :thumbsup:
Grant G. Posted April 20, 2010 Author #4 Posted April 20, 2010 Nice one,you done a good job.......I have seen a lot worse, from so called "Expert restorers" Good on ya Mate :thumbsup: Thank you very much gaz
gaz232sqn Posted April 21, 2010 #5 Posted April 21, 2010 Thank you very much gaz No worries Mate,your welcome :thumbsup:
Corpsmancollector Posted April 22, 2010 #6 Posted April 22, 2010 Looking good! If you don't mind me asking (I've got a fixed bail shell to restore) how did you choose your cork and where did you obtain it? I know J Murray sells it (and I assume it is the correct size) but I'm thinking of using model railway 'fine cork' made by Javis. Good job anyway! Will
gparlin Posted April 22, 2010 #8 Posted April 22, 2010 By any chance do you have any photos of the “before” restoration? If so that would be a great comparison. Gregg
BOLO Posted April 22, 2010 #9 Posted April 22, 2010 nice work, but it could use some dried dirt to simulate age
Grant G. Posted April 22, 2010 Author #10 Posted April 22, 2010 Looking good! If you don't mind me asking (I've got a fixed bail shell to restore) how did you choose your cork and where did you obtain it? I know J Murray sells it (and I assume it is the correct size) but I'm thinking of using model railway 'fine cork' made by Javis. Good job anyway! Will Hey Will, I'm only 16 so I don't really have forty bucks to drop on a bag of J Murray cork so I take a different approach. When ever my parents finish a bottle of wine, or whenever I'm at a family gathering, I always go arround and collect the corks to all the wine bottles. I take a piece of cork and grate it on a cheese grater (I usually use about two corks per helmet (with plenty of cork left over). I take the grated cork and sift it through a small mesh strainer (for consistency). I put the sifted cork (which should feel like powder to the touch and also stick to your palms if your hands are sweaty) into an empty seasoning shaker. I then paint a stripped shell with Krylon flat olive drab (using a brush). When the paint is still wet I shake the cork onto the wet paint (this process can be messy, but do not do it outside since the wind will ruin your results). once dry I rub off any loose cork and then paint a couple coats with krylon flat olive drab paint (spray). I'm sure railroad cork would work just as well but it may not be cheaper. - Grant :thumbsup:
Grant G. Posted April 22, 2010 Author #11 Posted April 22, 2010 Excellent restorative work! :thumbsup: Thank you Bugme, That means a lot coming from you! -Grant
Grant G. Posted April 22, 2010 Author #12 Posted April 22, 2010 By any chance do you have any photos of the “before” restoration? If so that would be a great comparison. Gregg I'm sorry Gregg, I do not but I will be doin another one rather soon and I will take pictures. There is a reenacting website which has step by step instructions and their technique is similar to mine. -Grant Helmet restoration
Grant G. Posted April 22, 2010 Author #13 Posted April 22, 2010 nice work, but it could use some dried dirt to simulate age I have contemplated leaving it out in the rain for a couple of days! -Grant
kjones5452 Posted April 22, 2010 #14 Posted April 22, 2010 :thumbsup: Bravo Grant! Last week I did exactly the same thing! We must have been reading the same forum at the same time.I decided the night before just to see if the Wal-Mart had what I needed,I got a bag of 6 bottle corks.the grader,salt shaker,Krylon Camo OD and I was set.I had no problems outside,just waited for the wind to die down some.Started the next morning and that afternoon I had 2 restored fixed loop helmets. You can't tell any difference between my 2 and either one of Josh Murray or ATF. I've never been a artsy crafty type guy and all thumbs to,so if I can handle it,no problem. It's also a whole lotta fun,you wouldn't think it,but it is.
Grant G. Posted April 22, 2010 Author #15 Posted April 22, 2010 :thumbsup: Bravo Grant! Last week I did exactly the same thing! We must have beenreading the same forum at the same time.I decided the night before just to see if the Wal-Mart had what I needed,I got a bag of 6 bottle corks.the grader,salt shaker,Krylon Camo OD and I was set.I had no problems outside,just waited for the wind to die down some.Started the next morning and that afternoon I had 2 restored fixed loop helmets. You can't tell any difference between my 2 and either one of Josh Murray or ATF. I've never been a artsy crafty type guy and all thumbs to,so if I can handle it,no problem. It's also a whole lotta fun,you wouldn't think it,but it is. That's great! Good work Mr.Jones! -Grant
Corpsmancollector Posted April 23, 2010 #16 Posted April 23, 2010 Hey Will, I'm only 16 so I don't really have forty bucks to drop on a bag of J Murray cork so I take a different approach. When ever my parents finish a bottle of wine, or whenever I'm at a family gathering, I always go arround and collect the corks to all the wine bottles. I take a piece of cork and grate it on a cheese grater (I usually use about two corks per helmet (with plenty of cork left over). I take the grated cork and sift it through a small mesh strainer (for consistency). I put the sifted cork (which should feel like powder to the touch and also stick to your palms if your hands are sweaty) into an empty seasoning shaker. I then paint a stripped shell with Krylon flat olive drab (using a brush). When the paint is still wet I shake the cork onto the wet paint (this process can be messy, but do not do it outside since the wind will ruin your results). once dry I rub off any loose cork and then paint a couple coats with krylon flat olive drab paint (spray). I'm sure railroad cork would work just as well but it may not be cheaper. - Grant :thumbsup: Grant, that's genius! I had never thought of using a bottle cork and a cheese grater, I'll have to give this a go! :thumbsup: When I do my next shell in a few weeks time, I'll try and post a how to or something. Thanks for the inspiration, Grant!
earlymb Posted April 23, 2010 #17 Posted April 23, 2010 Grant, that's genius! I had never thought of using a bottle cork and a cheese grater, I'll have to give this a go! :thumbsup: When I do my next shell in a few weeks time, I'll try and post a how to or something. Thanks for the inspiration, Grant! I think you need to use the coarser/bigger of the 2 grates? See this link for some close-up pics of the original cork finish on an absolutely mint Schlueter: http://www.usmilitariaforum.com/forums/ind...lueter,and,mint Greetz David
Grant G. Posted April 23, 2010 Author #18 Posted April 23, 2010 I think you need to use the coarser/bigger of the 2 grates? See this link for some close-up pics of the original cork finish on an absolutely mint Schlueter: http://www.usmilitariaforum.com/forums/ind...lueter,and,mint Greetz David Hey David, I use the very smallest side of the grater and those are the results i get, cork that has beeen grated using the large side is much to large- what looks small in your hand will look huge on a helmet, since the cork absorbs some paint and expands. -Grant :thumbsup:
Grant G. Posted April 23, 2010 Author #19 Posted April 23, 2010 Grant, that's genius! I had never thought of using a bottle cork and a cheese grater, I'll have to give this a go! :thumbsup: When I do my next shell in a few weeks time, I'll try and post a how to or something. Thanks for the inspiration, Grant! Thank you very much! -Grant
2ndID Posted April 23, 2010 #20 Posted April 23, 2010 Great job, the helmet looks great! :thumbsup: Thanks for sharing your corking method. Michael
Grant G. Posted April 24, 2010 Author #21 Posted April 24, 2010 Great job, the helmet looks great! :thumbsup: Thanks for sharing your corking method. Michael Thank you very much Michael -Grant
Radar44 Posted April 24, 2010 #22 Posted April 24, 2010 Very Nice, I wish I could do something like that for that price.
Brian Dentino Posted April 24, 2010 #23 Posted April 24, 2010 Grant, just a great job! The lid looks great, and very industious of you to use wine cork to redo it. Brilliant work, and it looks great! :thumbsup:
ccmax Posted April 24, 2010 #24 Posted April 24, 2010 Great restoration, looks close to the real thing.
gaz232sqn Posted April 24, 2010 #25 Posted April 24, 2010 Hi Grant. Great tips,and as before a great finish, the cork and cheese grater idea is genius. In the past I tried to, produce fine particled cork for a restoration job......I used my wife's food blender, and er,well she was'nt too pleased about it.....she made this quite clear "I'm not happy,about you using my blender". I replied "Me neither ,the corks far too big,your blender, is clearly not up to the job" Anyway I digress, keep up the restoring ,Grant, your an inspiration,to the next generation of collectors. :thumbsup:

Recommended Posts
Create an account or sign in to comment
You need to be a member in order to leave a comment
Create an account
Sign up for a new account in our community. It's easy!
Register a new accountSign in
Already have an account? Sign in here.
Sign In Now