mpguy80/08 Posted August 18, 2008 Share #1 Posted August 18, 2008 Greetings! Okay, I know that most of you out there have probably been modeling for quite some time, but I'm gonna kick this off with a little bit of basics for those who come here and look, but havent made up their mind whether or not to get into modeling. The basics are good for everyone, and we all can learn from each other in this. Keep in mind that this is the way I do things, and that doesn't make it right or wrong, just my way of doing it. I am always open to new tips and techniques, so if anyone has a good idea, don't hesitate to throw it in here for everyone to see. What's good for me might not be good enough for everyone, and new modelers can pick and choose from the rest of us. So, without Further ado, lets get cracking. First of all, you need a place to work. Keep in mind that I will be doing most of this first project in front of the computer here so I can post step by step what's going on. My Hobby Room is the next room down! The more space you have the better. It needs to be well lit, and have plenty of room to spread things out and have things handy. Second, you need to gather your tools. The first picture I will post here is of the basic tools I use to "push plastic". You need a hobby knife. These can be bought on the cheap... Xacto and Excel are two of many types. You will need #11 blades for the knife. a pack of 5 blades costs about two bucks or so. Plastic Glue (orange Tube), Super Glue, Super Glue accelerator (spray bottle), and Putty are the next things you want to get. The plastic glue is a solvent. It melts the plastic a bit to help adhere the parts together. Superglue can be used to fasten plastic parts, but I usually save that for resin or photo-etched parts. The accelerator helps set the super glue more quickly. The little yellow stick has a tuft on the end and is called a micro brush. I use these to apply superglue. Next we have a small pin vise (drill), files and a sanding stick. Various grades of sanding stick can be had from the nail polish aisle at any grocery. Hey... they work!!! A pair of tweezers, scissors, and sprue cutters are handy. I have a small rechargeable dremel tool. the tool costs about $40 and the bit set about $15. The roll of masking tape speaks for itself. Last but not least, I have a pair of maginfying glasses, because well, my ol' eyes arent the same as they used to be. Here is the pic of the tools. Link to comment Share on other sites More sharing options...
mpguy80/08 Posted August 18, 2008 Author Share #2 Posted August 18, 2008 Okay, now we have that out of the way, my next step was to choose a project that I could do rather quickly, and still show a step by step progress. I chose Tamiya's Modern U.S. Infantryman in 1/16th scale (120mm). There were two main reasons. One, the figure is fairly big, so it would be relatively easy on me poor eyes. Secondly, the uniform options I could portray with this kit would be interesting. Here is the kit we'll be working with. Keep in mind, that the basic techniques go for any scale. Link to comment Share on other sites More sharing options...
mpguy80/08 Posted August 18, 2008 Author Share #3 Posted August 18, 2008 As you can see, the kit itself gives a color reference of the Army Desert Combat Uniform, which I will refer to as the DCU. I mulled this one over, and looked at my references (a must for the modeler) and decided I was going to depart from the kit on it's choice of uniform. Out of the box, the figure is actually wearing the DCU Chemical Protective Over Garment (CPOG). I noted the similarities of the CPOG with the Army Combat Uniform, which is called the ACU. The long legs on the pants can be over looked somewhat, as I have seen plenty of soldiers given uniforms that are too big because that was all they had in stock that would fit. Here are the kit parts, mostly still on the sprues. Link to comment Share on other sites More sharing options...
mpguy80/08 Posted August 18, 2008 Author Share #4 Posted August 18, 2008 Here are pictures of the ACU (left) and DCU (right) side by side for comparison. Note the theater produced name tags on the DCU, and the velcro patches on the ACU. All patches are attached to the ACU by Velcro. Nothing is sewn on. Link to comment Share on other sites More sharing options...
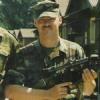
mpguy80/08 Posted August 18, 2008 Author Share #5 Posted August 18, 2008 One of the reasons I chose this particular kit was to portray the new "MOLLE" style gear. There are several types of the Tactical Load Bearing Vest (TLBV) that have been used since the late 1980s. Today, most deploying troops are given the new "Interceptor" body armor (IBA), the cover of which has multiple straps across the front, back, and sides of the vest for the attachment of the pouches and gear the soldier needs to fight and survive. It was found that to take the gear off, one had to remove the entire Interceptor vest. To ease this problem, the Army began to issue Tactical Over Armor Vests (TOAV) to the troops. The vest was similar to the IBA cover, so the pouches could be strapped to the vest instead of the armor, and could be removed without removing the IBA. The following are pictures of the TOAV. This was my personal set, bought by myself incase it was needed before I was issued the equipment. The pouches are attached to the vest, and the canteens and holster are attached to the belt. Link to comment Share on other sites More sharing options...
mpguy80/08 Posted August 18, 2008 Author Share #6 Posted August 18, 2008 here are the right and left side pouches respectively. I carried three two magazine pouches for the M-4 Carbine, two M-4 magazine pouches on the left and one M-4 magazine pouch on the right. I also carried a double magazine pouch for the 9mm M-9 pistol on the right front of the vest. As Military Police, I also carried the M-9 as a sidearm. Link to comment Share on other sites More sharing options...
mpguy80/08 Posted August 18, 2008 Author Share #7 Posted August 18, 2008 This is a view of the lower right side of the vest. Attached to the belt are two 1 QT canteens in ACU covers and a M-12 holster for the M-9 9mm Pistol. Link to comment Share on other sites More sharing options...
mpguy80/08 Posted August 18, 2008 Author Share #8 Posted August 18, 2008 Okay, that's it for tonight. It's after 2:30 am here, and I need to get some sleep. Tomorrow... er, later on today, I will get started on this project proper. To recap, we have shown the basic set of modeling tools, chosen the kit, and done a bit of reference work. Not bad for a few hours work. Just a word about references... Reference photos are everything! A good reference library is a must. I chose this kit to start because the best reference I have is the actual equipment I will be portraying on the figure. When I get up in the morning, I'll get some photos of part of mine. I'm still unpacking boxes and such, so its not totally set up yet. Good night all. Feel free to add anything relavent, or general questions you may have. Wayne Link to comment Share on other sites More sharing options...
The Meatcan Posted August 18, 2008 Share #9 Posted August 18, 2008 Wayne - this is going to be very interesting and I'll be following closely. I've been more of a "collector" than a "builder" for the last decade or so. Finding time (and space) to build is a big problem, but one day (ha!) I'll get back on track. I'm especially curious to see how you go about painting, weathering, and what types of paints you use on this figure. Nice job so far Link to comment Share on other sites More sharing options...
mpguy80/08 Posted August 19, 2008 Author Share #10 Posted August 19, 2008 Greetings and salutations, I'm back with part two of my little project here for the Forum. Today we are going to start with a bit of assembly and start painting. The paints I use are a mixed bag, consisting mostly of Testors Model Master enamels and acrylics, some Polly scale, Some Tamiya, and some acrylic fantasy paints as I find them useful. A word on brushes. You get what you pay for. I use Floquil or Leow-Cornell brushes. You can find good brushes on the cheap at Hobby Lobby and Michaels. I got a whole set of the green and purple brushes for about $6.you need small brushes for intricate detail like eyes and buckles, and all the way up to the wider brushes here for dry brushing. A good variety of brushes, well taken care of, will last you for quite awhile. Here are two pics of paints and brushes... Link to comment Share on other sites More sharing options...
mpguy80/08 Posted August 19, 2008 Author Share #11 Posted August 19, 2008 As you notice, I mark all my bottles with a 3/4" disk label and write the name of the paint on the cap along with the FS number if it has one. I also clearly mark my Acryl paints so I know what is Acrylic and what is enamel. I have an airbrush, but its not needed for this project. After attaching the legs to the upper torso, I begin by painting the base color, Testors Model Master Armor Sand, FS. 30277, coating the legs and torso with a thin coat. After the first coat dries, add a second coat for total coverage. Do not paint the areas where the arms and feet will attach. Glue will not stick to paint. Link to comment Share on other sites More sharing options...
mpguy80/08 Posted August 19, 2008 Author Share #12 Posted August 19, 2008 Once the legs and torso have a good coat of sand colored pain which will be the base for the ACU pattern, plan out where you want your pouches to go and scrape an area of paint off where you want to fasten the pouches. Then once the pouches are fastened, coat them with the base color as well. At this time, I also dry fitted the arms to make sure they would not conflict with the pouches. There are two sets of arms with this kit. One in firing position and the others slightly lowered. I chose the second set of lowered arms and fixed the pouches accordingly. Once this was done, I chose Testor's Model Master Enamel Faded Olive Drab for my light green portion of the digital ACU scheme. I began painting on the leg as per the pictures. Tomorrow I'll continue painting the ACU scheme, and also work on some of the details of the model. G'Nite!!! Wayne Link to comment Share on other sites More sharing options...
mpguy80/08 Posted August 25, 2008 Author Share #13 Posted August 25, 2008 Just a wee bit of an update here... It's been a busy week, and I havent gotten to sit down and work as much as I'd like on the figure. I want to get the camouflage on the main body done before I post another picture, but it is taking me longer than I expected to get it done... imagine painting hundreds and hundreds of tiny squares... because the pattern I'm replicating is just that... a digital, pixelized pattern... wish me luck!!! Wayne Link to comment Share on other sites More sharing options...
mpguy80/08 Posted September 7, 2008 Author Share #14 Posted September 7, 2008 Hi Gang, Sorry for the delay but things got a bit hectic here for a bit and well, the camouflage scheme on this was a little more than I had expected. As I completed it, it is a bit out of scale, but it gives a good impression of the digitalized nature of the pattern. The first pic here shows the torso and legs, with a base coat of Testors Model Master Armor Sand, FS 30277, the light green is Model Master Faded Olive Drab, and the darker green is Model Master Field Green, FS 34095. Link to comment Share on other sites More sharing options...
mpguy80/08 Posted September 7, 2008 Author Share #15 Posted September 7, 2008 This next picture shows the Torso and legs, the arms , helmet, butt pack and Rifle. As you can see I have sone a bit of detailing on the arms. I have painted the american flag on the right pocket flap, an MP velcro patch on the left pocket flap, and the unit patches on the main portion of the arm pockets. The unit patches were painted by fors painting a black disk, then going over that with Faded Olive Drab, leaving a black surround. This is easier to accomplish than trying to paint a black outline around a green disk. The buttpack is painted in FIeld green, then drybrushed with Armor sand to weather it. If you look closely at the right leg, it looks a little more faded than the rest of the torso... I have started the drybrushing process on that leg to give you the contrast between the weathered areas and the freshly painted ones. Link to comment Share on other sites More sharing options...
mpguy80/08 Posted September 7, 2008 Author Share #16 Posted September 7, 2008 This photo shows some of the details that are going to go on the figure. The Pistol in holster, canteens, and bayonet will all be used. Link to comment Share on other sites More sharing options...
edgeer Posted September 8, 2008 Share #17 Posted September 8, 2008 looking nice there mpguy80/08. I do have one question though. Shouldn't the US Flag be facing forward? Or is the figure, depicting a service member prior to the orders to reverse the US Flag. Link to comment Share on other sites More sharing options...
mpguy80/08 Posted September 8, 2008 Author Share #18 Posted September 8, 2008 looking nice there mpguy80/08. I do have one question though. Shouldn't the US Flag be facing forward? Or is the figure, depicting a service member prior to the orders to reverse the US Flag. As soon as I got it all put together I saw that little mistake and decided to use it as a reinforcement for using your references... Its one reason I havent posted the completed figure just yet so I can fix and note it in the construction notes. I'd been doing most of the work on the figure late late at night, and didnt catch it at first. I was wondering if anyone would pick up on that. Great catch! Wayne Link to comment Share on other sites More sharing options...
steamer98 Posted October 22, 2008 Share #19 Posted October 22, 2008 looks great!! I hope to see pictures of it when it's finished!! Link to comment Share on other sites More sharing options...
jhs1970426 Posted October 23, 2008 Share #20 Posted October 23, 2008 That is really cool Wayne! I am looking forward to seeing the finished result!! the detail is absolutely amazing! I build model cars and i find painting the few emblems on the body and the gauges rather tedious, but how did you do all those TINY squares?? Link to comment Share on other sites More sharing options...
mpguy80/08 Posted October 23, 2008 Author Share #21 Posted October 23, 2008 That is really cool Wayne! I am looking forward to seeing the finished result!! the detail is absolutely amazing! I build model cars and i find painting the few emblems on the body and the gauges rather tedious, but how did you do all those TINY squares?? A magnifying glass and a really tiny brush... I've been a little busy here lately with real life and trying to grab a little time to finish this one up so I can get to the next one. Honestly, I just missed a local contest this past weekend because I hadn't had the time to finish anything. Wayne Link to comment Share on other sites More sharing options...
jhs1970426 Posted October 23, 2008 Share #22 Posted October 23, 2008 a tiny paint brush and mag glass? dang! well all that time and energy is paying off! looks awesome so far! Link to comment Share on other sites More sharing options...
twhigham Posted October 24, 2008 Share #23 Posted October 24, 2008 You mentioned that you had decided to go with the arms lowered, when you were talking about the placement of the pouches. Do you have a pose in mind - like holding a rifle while running, or something that shows movement or action? Or is this going to be something similar to a monument pose, like he's standing with his rifle slung and his arms at his sides? Good series to follow. I don't usually do figures but I've found myself having to do them in order to build dioramas of aircraft and such. I like your reference directives - certainly something to keep in mind! Link to comment Share on other sites More sharing options...
mpguy80/08 Posted October 28, 2008 Author Share #24 Posted October 28, 2008 You mentioned that you had decided to go with the arms lowered, when you were talking about the placement of the pouches. Do you have a pose in mind - like holding a rifle while running, or something that shows movement or action? Or is this going to be something similar to a monument pose, like he's standing with his rifle slung and his arms at his sides? Good series to follow. I don't usually do figures but I've found myself having to do them in order to build dioramas of aircraft and such. I like your reference directives - certainly something to keep in mind! The weapon will be in the high ready position... not quite shoulder level, but ready to pull up into firing position at a moment's notice. Wayne Link to comment Share on other sites More sharing options...
viking73 Posted February 12, 2009 Share #25 Posted February 12, 2009 Any updates on this? I'd love to see the final product if it is done... Link to comment Share on other sites More sharing options...

Recommended Posts
Create an account or sign in to comment
You need to be a member in order to leave a comment
Create an account
Sign up for a new account in our community. It's easy!
Register a new accountSign in
Already have an account? Sign in here.
Sign In Now